Setup Wireguard WAG VPN with MFA enable on AWS EC2


What is a VPN?
A VPN, or Virtual Private Network, is a secure technology that allows you to create a private and encrypted connection over the internet. It enables you to protect your online privacy, hide your location, and securely access websites and services as if you were in a different location.It hides your online activities by routing your data through a remote server, encrypting it along the way. This makes your connection private and secure, protecting you from prying eyes, whether you're at home or using public Wi-Fi. VPNs are often used to access region-restricted content, maintain online privacy, and enhance online security.
What is a Wireguard?
WireGuard is a modern and secure open-source VPN (Virtual Private Network) protocol that offers fast and efficient encrypted connections. It's designed for simplicity and ease of use, providing a lightweight yet robust solution for secure data transmission over the internet. WireGuard's simplicity makes it an attractive choice for individuals and organizations looking to establish a secure and private network connection.
What is WAG?
Wag is an opensource tool. Wag adds 2fa and device enrolment to wireguard.It allows you to restrict routes based on 2fa while allowing other routes to remain public if a client has a valid public key.
Let's setup the VPN server on ec2
Launch Ec2
Go to the EC2 page and click on Launch Instance.
Give the EC2 name at your convenience.
Select Ubuntu image(22.04).

Select the Instance type at your convenience. (Recommended: t2.micro)
Create an SSH key pair if you don't have one.
It will download the SSH private key. Keep it with you. It will be useful when you want to ssh into ec2.
- Keep all settings as their default values as we are focusing on deployment.

Click on Launch instance.
Connect with EC2.


- Install
iptables,libpamandjq.
apt update
apt install iptables
apt install libpam0g
apt install jq
- Check If it is installed or not.
iptables -L

iptables and the wireguard device.- Forwarding must be enabled in
sysctl.
sysctl -w net.ipv4.ip_forward=1
Setup WAG
- Create directory to install WAG.
mkdir -p /opt/wag
cd /opt/wag
- Download WAG(Binary release (requires glibc 2.31+)).
curl -L $(curl -s https://api.github.com/repos/NHAS/wag/releases/latest | jq -M -r '.assets[0].browser_download_url') -o wag
chmod 700 wag
- Generate configuration file.
sudo ./wag gen-config

- Change the config file name.
mv config.json.* config.json
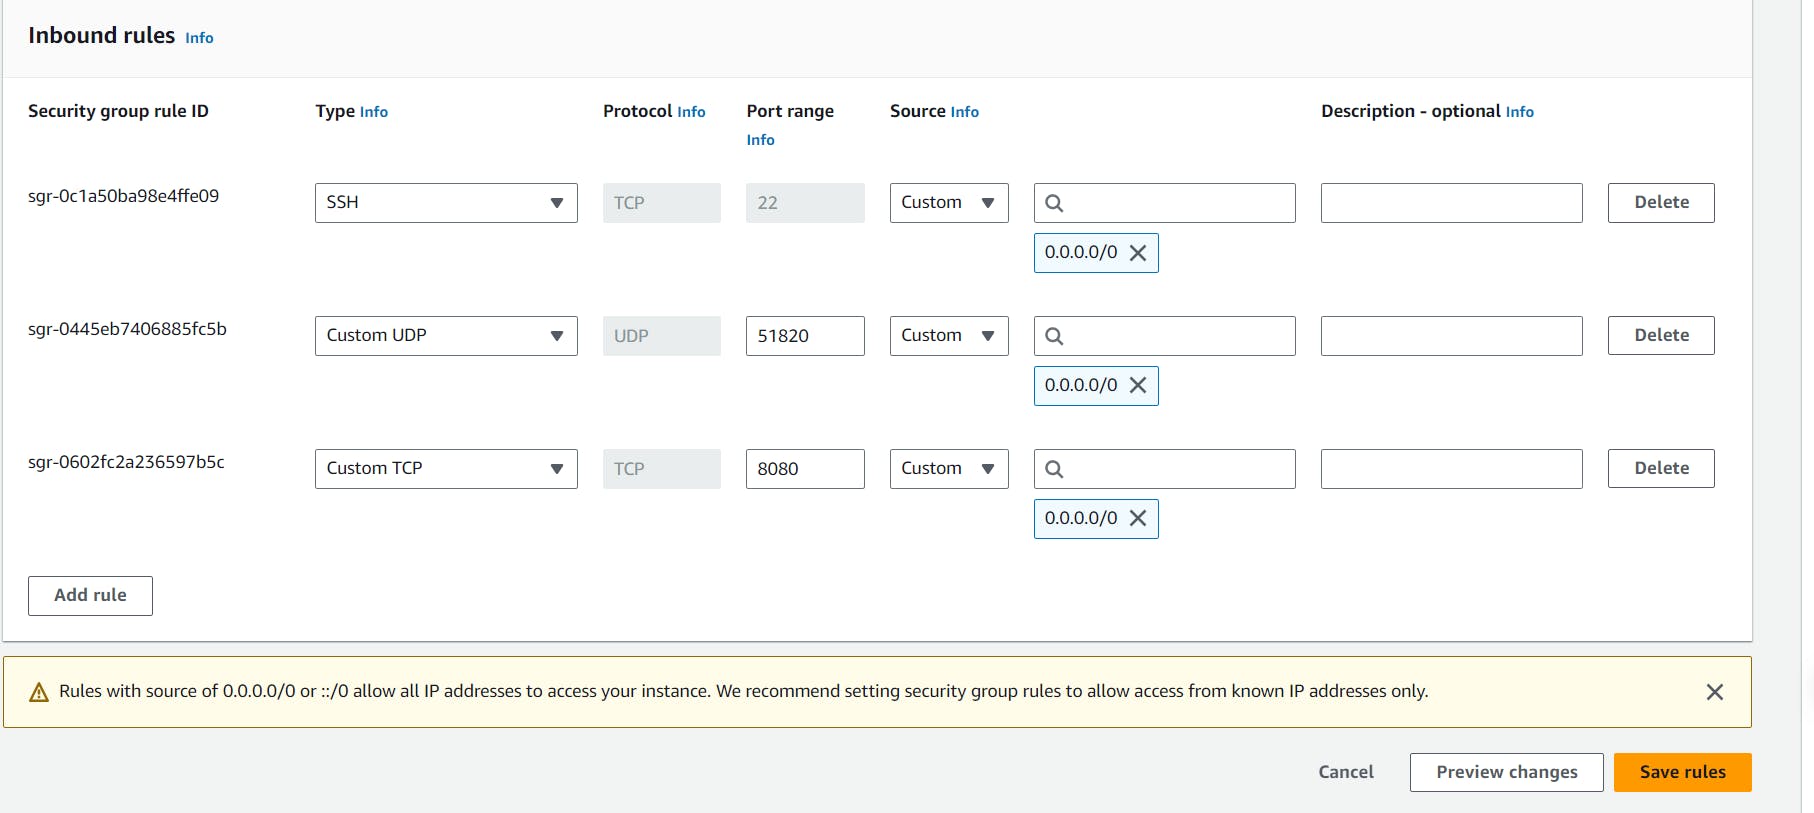
- Change the wireguard port to 51820 and add ACL in the config file.
"Wireguard": {
        "DevName": "wg0",
        "ListenPort": 51820,
        "PrivateKey": "W/q3O0qATduQAau81GjkmA7Z71CuGPBguW36gZl2Vtk=",
        "Address": "10.1.2.1/24",
        "MTU": 1420,
        "PersistentKeepAlive": 25,
        "DNS": ["8.8.8.8"]
    }
- Add ACL's rule.
Here, a group named "admin" is being created and the user "dhrumil" is being added to it. The user will be permitted to access the Internet without the need for 2-factor authentication, but will be required to authenticate to access the host 172.31.16.255.
"Acls":{
      "Groups":{
         "group:admin":[
            "dhrumil"
         ]
      },
      "Policies":{
         "group:admin":{
            "Mfa":[
               "172.31.16.255/20"
            ],
            "Allow":[
             "0.0.0.0/0"
            ]
         }
      }
   }
- Your configuration file should look like this.
{
    "Proxied": false,
    "NAT": null,
    "HelpMail": "dhrumil@gmail.com",
    "Lockout": 5,
    "ExternalAddress": "54.224.191.174",
    "MaxSessionLifetimeMinutes": 1440,
    "SessionInactivityTimeoutMinutes": 60,
    "ManagementUI": {
        "ListenAddress": "",
        "Enabled": false
    },
    "Webserver": {
        "Public": {
            "ListenAddress": ":8080"
        },
        "Tunnel": {
            "Port": "80"
        }
    },
    "Authenticators": {
        "Issuer": "dhrumil-org",
        "Methods": [
            "totp"
        ],
        "DomainURL": "",
        "OIDC": {
            "IssuerURL": "",
            "ClientSecret": "",
            "ClientID": ""
        },
        "PAM": {
            "ServiceName": ""
        }
    },
    "Wireguard": {
        "DevName": "wg0",
        "ListenPort": 51820,
        "PrivateKey": "W/q3O0qATduQAau81GjkmA7Z71CuGPBguW36gZl2Vtk=",
        "Address": "10.1.2.1/24",
        "MTU": 1420,
        "PersistentKeepAlive": 25,
        "DNS": ["8.8.8.8"]
    },
    "DatabaseLocation": "devices.db",
    "Acls": {
            "Groups":{
         "group:admin":[
            "dhrumil"
         ]
      },
      "Policies":{
         "group:admin":{
            "Mfa":[
               "172.31.16.255/20"
            ],
            "Allow":[
             "0.0.0.0/0"
            ]
         }
    }
}
}
- Start WAG.
./wag start -config config.json

wag will create a database "devices.db" where it will store all users and their respective keys.
Create service for the wag.
- Go to
systemfolder.
cd /etc/systemd/system
vi wag.service
- Create wag.service.
[Unit]
Description=Wireguard configuration

[Service]

User= root

WorkingDirectory=/opt/wag
ExecStart=/opt/wag/wag start

ExecStopPost=/opt/wag/wag cleanup

Restart=on-failure
RestartSee=10

KillingSignal=SIGINT


[Install]
WantedBy=multi-user.target
- Enable and start service.
systemctl enable wag
systemctl start wag
- Check the status of service.
systemctl status wag

- Create user dhrumil, which we mentioned in the admin group.
./wag registration -add -username dhrumil
- It will give you token to generate client configuration file.

- Add the rules below to the security group of ec2.
- Download client configuration.
curl http://ec2_public_ip:8080/register_device?key=<generated token>

- Restart the WAG service.
systemctl restart wag
Great!!! Your VPN server is ready.
Setup the Wireguard client on Windows.
- Download wireguard client for Windows.
https://www.wireguard.com/install/
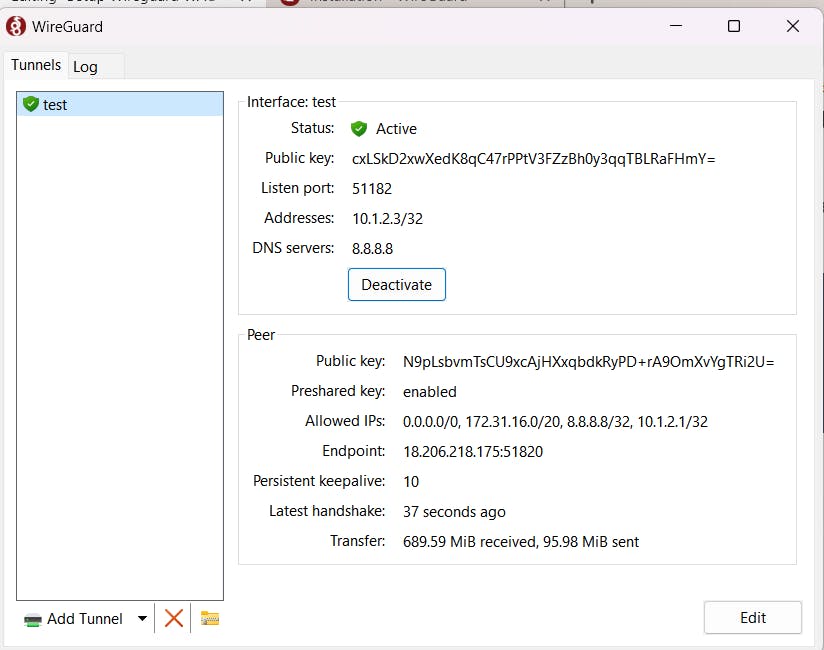
You can see this type of screen for wireguard.
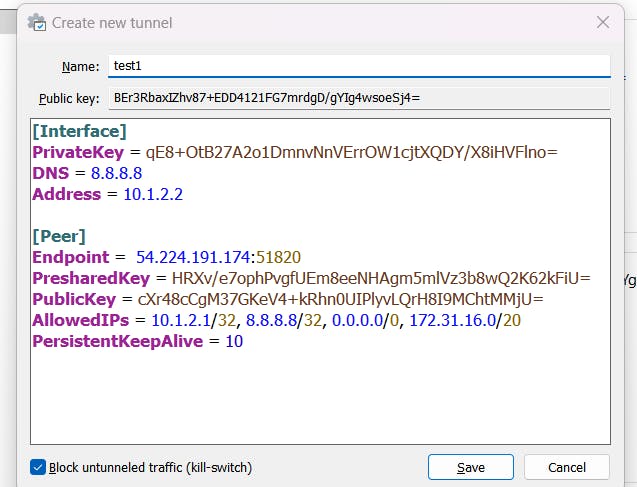
- Now, Add client configuration to connect with our VPN server.
Click on Add tunnel -> Add Empty tunnel
Add client configuration, which we have generated.
- Activate VPN connection.

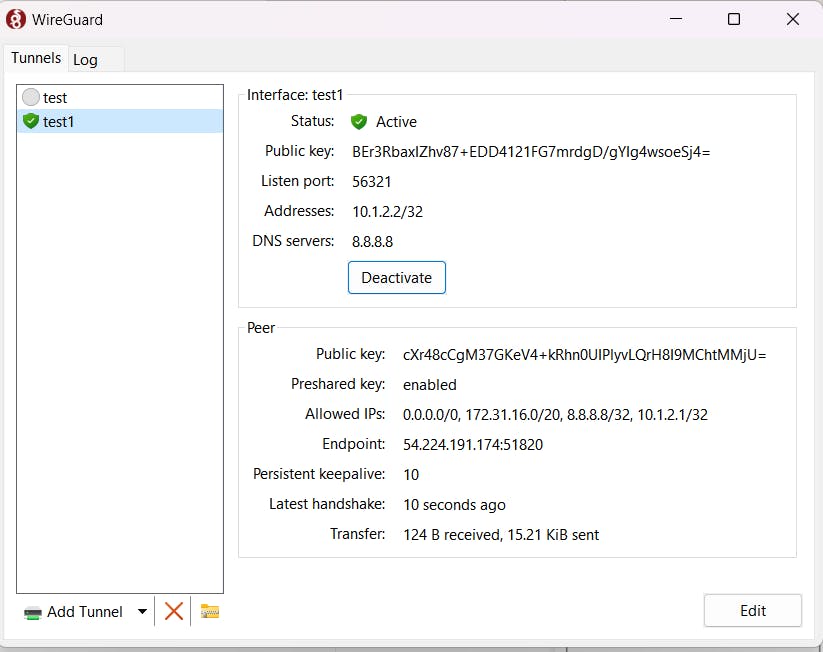
- Now, We can access the second ec2 from the VPN.

Opps.. It's not working. Why????
As we mentioned in the configuration, to access this host we need 2fa. Let's setup 2fa with google authenticator.
 "Policies":{
         "group:admin":{
            "Mfa":[
               "172.31.16.255/20"
            ],
            "Allow":[
             "0.0.0.0/0"
            ]
         }
    }
Setup 2fa with Google authenticator.
- Download Google authenticator on your mobile phone.
Go to the VPN server(10.1.2.1).

Scan this QR code from the Google authenticator.
You have connected the Google authenticator with VPN server.
Enter the Number(OTP), Which You can see on your app.
After Entering the OTP, You can see the authorization page.

- Now, You can see the Apache default page.

Reference
Setting up a VPN with Wireguard Server on AWS EC2. - DEV Community